The extensive-angle lenses permit, as their call suggests, to photograph a huge variety of perspectives. Regrettably, the resulting picture is distorted by using distortion, which is important for this form of lens. This academic will, consequently, display you the way to accurate these outlook issues.
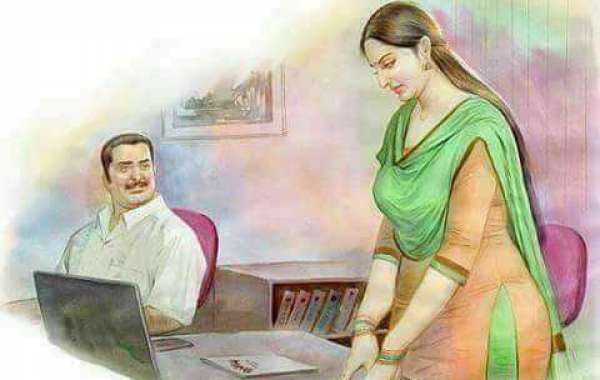
The legal guidelines of optics are for that reason made: utilizing taking a photograph with its huge-perspective, we suddenly get a photo with a distorted perspective. The first picture in this tutorial is a great example. After I took this slide, I was against a wall. The best answer to take this picture: take out the 24 mm and positioned the camera at the floor to avoid camera shake (I normally journey very light and therefore I never take my tripod that is a long way too cumbersome).
The result is of a route without attraction: I, consequently, ended up with an image that not simplest has a fleeting attitude but except, it isn't always horizontal! The fact of getting taken it in low diving too, even greater, accentuated the effect !!
So this is some image editing work in attitude! (it's far the least we will say…). This could take vicinity in 2 stages:
Straighten and correct the distortion impact.
Recreate missing regions
The picture enhancing software used in this tutorial is Photoshop factors.
Straightening and correcting picture distortion.
Those operations are done very clearly via an appropriate lens distortion clear out… as soon as you have clicked on this feature (in the filter menu), a window appears and you have several picks:
Distortion suppression: this function is to be used when as an example your horizon or your homes are rounded or curved. You should recognize that this optical phenomenon is a gift on all lenses. If this distortion is sort of 0 in the center, it can be visible on the periphery of your snapshots (all of it relies upon on the sort of lens). This impact is consequently amplified by using the guidelines of image composition. It's miles utilizing composing your images utilizing no longer setting, as an example, the horizon proper within the middle that you accentuate this phenomenon of distortion.
Vignetting: This option corrects the black halos that appear in the corners of your pix. It is consequently no longer worried in the manner of correcting perspectives.
Perspective choice: this function may be very interesting because it permits you to accurate pictures taken from a low attitude or sideways. This is what we are going to do with our example through moving the Vertical angle slider to the left (the horizontal and vertical traces serve as a manual). To save you the image from being cropped in the course of this method, I propose which you use the edge Extension putting with the aid of moving the slider to the left.
Angle: this parameter will allow us to straighten the picture. The principle of use is equal to the factor above.
The picture is now rid of all its optical distortions. Sadly, as you can see, the form of the photo is particularly original. The cropping tool will permit us to find an extra traditional format. To preserve the width/top ratios of conventional photo codecs, you need to imply them in the empty fields that appear beneath the menu bar once you've got decided on the Rectangle choice tool ("fixed props" mode and ratio 3 / 2 for SLRs or 4/three for the compact layout). In our case, we will transfer to the 4/three layout to preserve the entire height of the monument. As soon as the area is chosen, visit the image menu then Crop.
Introduction of missing regions
Correcting views can, as you may see, extensively distort your image. So don't forget the instant you take the photograph that you may crop your photo strongly. Do now not hesitate to make tremendously extensive framing or to take numerous pix which you may then bring together in panoramic.
If, as in our example, this turned into now not deliberate, we can create the lacking zones. Watch out but of the limits of this technique. Photoshop can't "guess" what was within the white areas. Filling the missing regions of an image is, therefore, best possible for regions with a sure uniformity: ground, sky, wall, vegetation…
The function that will allow us to do that manipulation is the buffer device. The principle is as follows: click on at the tool in question then illustrate to the software the area of the photo to replicate by pressing the alt key. The cursor then takes the shape of a viewfinder. Click on the place to be copied, then flow your cursor to the region which needs to acquire the vicinity to be copied. By transferring the stamp tool you'll be aware that the white region fills with the target region you have selected.
Right here, the image of this monument is now horizontal and rid of those views.
Also read more,
Image retouching is the way toward changing a picture to set it up for a definite introduction. Retouchers commonly perform activities that are little confined changes in accordance with a picture. Typically finished after globalized modifications, (for example, shading revision), correcting is the cleaning of a picture. When the white equalization.
Tag:
# Image masking Cut out pictures from background