After having offered you what are the five golden rules to admire to retouch and restore your pics, here are the 5 equipment that you absolutely should grasp to assist you to retouch and restore your pictures efficaciously.
Whilst you open photograph enhancing software, you have to understand that, for uninitiated people, there's something to panic a bit. Certainly, the jargon of the image retouching career does not float from the supply. Terms like histograms, curves or fusion, as an example, remind us extra of college math or physics instructions than photography. Thankfully, as you will see, the creation of photomontages is based on 2-3 fundamentals that you really should understand. Once we understand and grasp these factors, we will evolve and develop.
First of all, I would like to factor out that the capabilities provided under are of direction common to all image modifying software. If not, take into account which you do not have photo editing software in step with se and run to a shop to update it. The screenshots and names of the diverse menus in this text are all from Photoshop factors software program.
Here are the five capabilities or equipment essential for growing photomontages…
Layers
That is the basis. Without layer, no photo editing or at least, no photomontages. It is so critical that you may be aware that your software has a menu with that call.
How do these layers work?
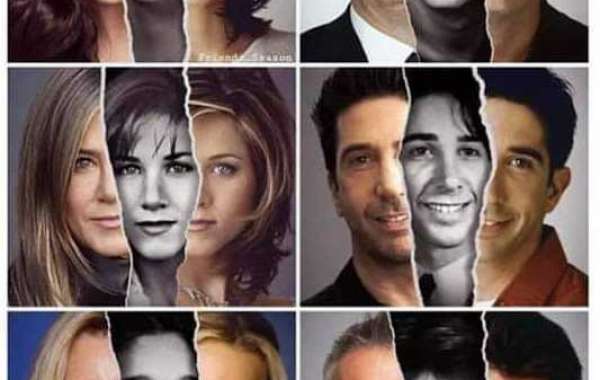
You could constitute a layer as a transparent sheet. This one will, consequently, receive a detail (texts, pix or forms). If the layer element does no longer cover the complete surface, we will be capable of seeing what's beneath at the regions that stay obvious. A photomontage is, therefore, a superposition, an assembly of layers.
We can see in the example above how this photomontage was built: The town is the background of the photo. Above is located the monkey then comes to the girl and ultimately the face of the person.
The interest of the layer is obvious: each detail is unbiased of the opposite factors of the photograph, it can, therefore, be changed without touching the relaxation of the photomontage (as an instance: editing the girl).
You could then apply special treatments to this accretion. It could, as an example, be connected to another layer, assigned an effect, play on its opacity… in quick, you understand, the layer is for photo modifying, what the wheel is for a bicycle.
The fusion mask
While you create a photomontage, you very often need to play with the transparency of the layers. However, those do no longer allow handling unique tiers of transparency (opacity). When you modify this opacity, it's far equal to the entire layer. The solution to this problem is therefore referred to as the fusion mask. These masks will permit you to create variable opacity zones (from 0 to a hundred%) on a layer. You could easily spot the fusion masks with its white rectangle form, located to the right of the layer and linked to it through its small chain.
In the instance, above we can see the fusion mask colored in black and numerous shades of grey.
On a fusion mask, the white is completely opaque, the black let's examine all of what is beneath (opacity = zero%) and the gray, or as a substitute, the grey, could be extra or less opaque depending on whether 'they will be more or much less clear.
The gain of the fusion masks is that one could permanently readjust the opacity zones. Indeed, if as an instance, a place is just too obvious, it's miles enough to position a touch grey at the fusion masks to opacify the vicinity in the query.
Selection gear
The way to reach a photomontage in case you do not grasp the choice equipment? The answer is simple: it is very hard and onerous!
Right here too, as with layers, you may find that the software has a menu dedicated to choices. The menu is therefore supplemented by using a multitude of very numerous tools, every with their specificity. This goes from the “Lasso” device which lets in approximate clipping to the “Pen” tool which could be very unique and reserved for professional software.
Every device has a robust factor and its susceptible factor. These have many alternatives and can, therefore, be finely configured. So we turn out to be with flexibility and a completely extensive range of opportunities.
Understanding this equipment properly will permit you to companion them, integrate them efficiently to reach relatively quickly and easily at the favored selection.
Retouching equipment
It's miles the second one principal category of equipment. These are the ones we can use to regionally touch up its layers. These equipment offer very essential opportunities for retouching and advent.
Observe that these are precisely like the selection gear: they every have their strengths and weaknesses and are finely configurable.
Filters
The closing function to master to make lovely photomontages issues filters. All of us performed at one time or any other with the filters. They are very easy to use and you could right now see the result at the photo. However, after the moment of discovery, we fast come to surprise what can all of them be used for, especially because some of them give as an alternative unexpected consequence whose quit we can hardly ever see. We unexpectedly locate ourselves with filters with very evocative names like an instance the filters "Blur", "Grain photograph" or "picture filter out". Others, alternatively, are a lot less so with their barbaric names like "Isohélie", "Médiane" or "Passe-haut". Luckily, the picture modifying software program had an excellent concept to categorize them.
Direct effect filters. Those are the best to use due to the fact their aesthetic effect at the photo is immediate. With them, we arrive without delay at the final result (see picture below). Examples of direct impact filter categories: "inventive", "caricature", "Aesthetic".
Follow the "Radial blur" filter
Filters with indirect consequences. Applying the selected filter does now not generate a classy effect. It needs to be mixed with different functions of the picture editing software program for its interest to be exploitable. Those filters are therefore reserved for folks that have already got an amazing mastery of image editing. Examples of categories of filters with indirect effect: "Adjustment", "Miscellaneous".
The impact of a clear out being carried out at the whole of a layer, one advantage from the blow of all the processing alternatives which may be carried out to this one (masks of fusion, selections, opacity…).
Also read more,
Looking for Cut out pictures from background online services?? Clippingphotoindia is imparting online offerings of reducing out photograph Background at affordable fees.
Tag: