Are you now not satisfied with the sepia firming supplied as widespread by your picture modifying software program or digital camera? Why now not do it your self? With this technique, you may sooner or later be capable of creating your sun shades of color.
The colorimetric shift of your snapshots can in many cases make it viable to restore the appeal to a photograph that you thought turned into misplaced. Indeed, it's far often interesting to carry out this remedy in the following cases:
To get better a blurred photograph, you had to push the sharpness to the most. Abruptly, your photo has a grain or important artifacts.
Your picture could be very contrasting and it does now not make plenty in shade.
The "old image" impact that consequences from this colorimetric shift normally is going thoroughly with, as an instance, panorama snapshots with a threatening sky, road scenes took "immediate" or pics.
The photograph on this tutorial is a superb instance. Whilst taking pictures, the wind changed into blowing difficult enough and my tripod moved very slightly. Result: a blurred picture (which we do not necessarily see on the display because of its length). So we are going to provide it a second existence with the aid of giving it a little "antique age".
So let's examine proper away from the way to do this conversion. As usual, I detail the technique with both Photoshop factors (PSE) and the Gimp software program.
With Photoshop factors (PSE):
Start by converting your photo to black and white. To try this, go to the Accentuation / Convert to black and white menu then choose one of the presets presented by way of PSE (placing panorama in the instance underneath) or decide your personal by way of playing with the intensity sliders and/or of comparison.
Add a Hue / Saturation adjustment layer and test the "Redefine" choice earlier than transferring the sliders to reap the desired effect. You can act on three parameters:
The color that permits you to choose the favored color.
The saturation which performs on the quantity of gray intending to be gift inside the color you have got decided on. A fairly low price (between 5 and 20) will permit you to provide a mild tint.
The brightness will allow you to decide the mild intensity of your color (from mild to dark).
Adjustment layer window Tint Saturation Brightness
I do not use the 0.33 parameter very often. I opt to upload a 2nd evaluation Brightness adjustment layer (Layer / New adjustment layer…). In case you also pick out this option, do not hesitate to push the sliders to excessive values. Certainly, as announced above, the coloration modifications accommodate many vital variations that there may be among the light tones and darkish tones. In the images under, the reality of strongly contrasting the photograph gives them a "dramatic" rendering.
To help you together with your settings, right here are some examples of renderings with the values of Hue, Saturation, and Brightness (the values are the same for each software program):
In case you need to feature a touch grain to your photo, do not be shy. That is the case for this picture which I discovered a touch too smooth. To try this, visit the clear out menu then Noise/upload Noise…
The Gimp software:
The conversion to black and white is executed via the colors / Desaturate menu ... As for Photoshop, you have the choice between numerous presets (clarity, brightness or common).
Adding comparison is completed through the same menu (colors / Brightness-comparison…).
Sooner or later, for the colorimetric shift of your photo you must no longer use the Hue-Saturation characteristic as in Photoshop but the Colorize function (always in the colorings menu).
A way to place a photo on your photo image modifying?
The idea of placing a photo to your photograph is a unique way to beautify your portraits. Then blend black and white with shade and you will get a result of the most lovely effect ...
The conclusion of this photomontage requires to have software which manages the layers. In this educational, we can use Photoshop Elements and Gimp.
With Photoshop factors:
This picture montage is executed in 2 steps: first, you need to create the photo within the photograph after which convert the rest of the photograph to black and white.
Making ready the coloration photo.
Create a new layer (Layer menu then New / Layer…) right-click on within the choice frame then choose the option Fill selection. Pick out the white coloration then validate it. You now have a white body wherein you made your choice.
Take the Rectangle selection tool and choose the constant proportions option in the Mode subject. Suggest a 3/2 ratio to have identical proportions as the reflex format. Choose the place of the photo you want to highlight.
Visit the selection menu then regulate/contract… select a cost of around 20 pixels (the better it's far, the thicker the body of the photograph) and validate. A new selection seems and flawlessly targeted to your white rectangle. Return to the layer containing the image, right-click on within the choice and select option Layer employing reproduction. A brand new layer is positioned just above.
Take this deposit and circulate it utilizing a drag and drop above the layer containing the white rectangle. Pick out these 2 layers then hyperlink them through clicking on the small chain gift within the Layers window.
The shading effect of the photograph is created by way of going to the Layer menu then Layer fashion/fashion settings ... Test the Drop shadow box and choose the values of your choice.
It's far quality to slightly tilt the small framed image you simply created. To do that select one of the layers making up this picture and click on the selection device. Role your cursor on one of the corners of the choice, then rotate the photo.
To carry out the image you just created a little greater, you may drastically improve the brightness or comparison via including one or greater adjustment layers (Layers / New adjustment layer). To make this effect the most effective observe to the photograph in the body, make certain you pick the layer in query and pick the Create Clipping mask choice within the Layer menu. This adjustment layer is then slightly shifted to the proper and an arrow seems.
The passage of the black and white photo.
There are several methods to transform a photograph into black and white. I propose which you use the Convert to black and white… feature from the Accentuation menu. With this feature, you may play on pink, inexperienced, blue and contrast tones to rebalance the hues and enhance the very last rendering of your picture.
The Gimp software:
The construction common sense remains equal:
Take the square selection tool then take a look at the constant alternatives and specify the three: 2 ratio.
Create a new layer then select the fill device (the paint bucket). The white shade needs to be selected. Ensure the brand new layer is chosen and click in the choice rectangle to paint your rectangle.
To create the photograph, visit the selection menu then select the reduce characteristic… select a price of 20 pixels then validate. The border of your photo body is created.
Return to the layer on which your picture is, then use the reproduction after which Paste function in the Edit menu. As you can see, a floating choice layer appears above the stack (1). You just need to create a new layer (2) to look at your image seem. To link the white body with the recorded image, click at the proper of the attention on the 2 layers involved (three). The small chain seems.
To create a shadow to your photo, visit Filters / Shadows and light / Drop shadow… decide the opacity and the volume of your shadow then validate it. Link the brand new layer that has just been created with the opposite 2.
Also read more,
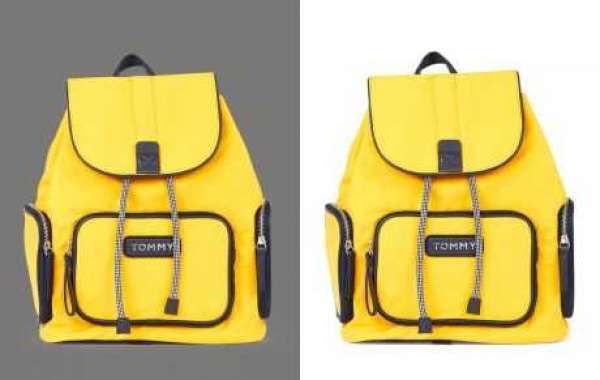
Clipping Path Service And Photo Retouching Services Provider For eCommerce Product Images. Solicitation A Quote For Your New Project.
Tag:
# image post production services clipping path service provider company