Now, I suggest to make a jump in the past and to meet you in 1907, to detect how the photographers of the time proceeded to restore and retouch the photos
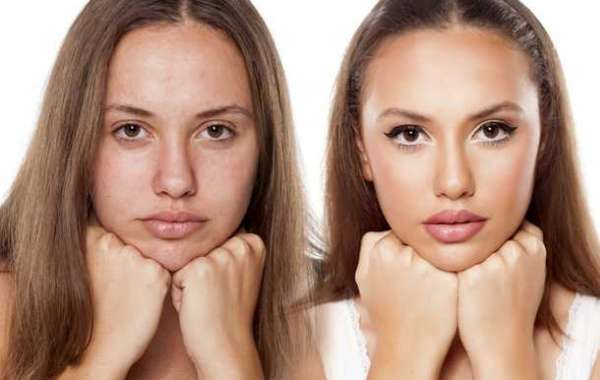
The retouching of photographs doesn't date from the arrival of the electronic but from the creation of the photo. Since always, the photographs are optimized. We must not eliminate sight of the fact that the photograph is merely a representation of fact and that touching up your photos isn't necessarily cheating. Portrait Image retouching service providing a fantastic level of detail. Portrait retouching services wonderful quality results. skilled headshot retouching.
It was a while because I was trying to comprehend the way the photographers of the time were doing their retouching. Apart from 2-3 things, I didn't know anything about their way of work.
It was through a personal visit to the Museum of Photography in Bourg Blanc (29 ) by Mr. Yves Simon that I had the answer to this question. He very kindly gave me the book composed by Paul Ganichot qualified Retouching negative and positive signs (Editions Charles Mendel).
Before going farther, I thank Yves very sincerely, for the gift of the book and for the many advice he can give me during the trip. If one day you spend in the Brest area, stop, it is free. The memorial is annexed to the town hall, so you can not miss it.
So I read Paul Ganichot's 112-page book. This report is a synthesis. It integrates both quotes from the writer that clarifications on my role.
It's really a unique article, very different from what you are used to reading on this blog. On the other hand, the editorial lineup is respected since it is still a question of retouching photographs.
This book appears to have had success because I discovered online traces of 7 different editions printed between 1895 and 1910. The version presented for you here's the fifth version. There's not any date on the book but from what I could find on the net, it will date from 1907.
This book is divided into two components. I alternate between present and past to allow you to differentiate the writer's opinions from my comments...
PART ONE: RETOUCHING THE NEGATIVE
Like the photographer of today, that of the early twentieth century wanted gear and assorted tools to effectively retouch his photographs. The writer therefore logically begins with the demonstration of this retouching material.
In the same way that photographers that want to retouch and restore their photographs with a minimum of precision have a graphics tablet, the retoucher photographer of the early twentieth century also had a material to work in great conditions. This material was called a desk to retouch.
This instrument consisted of 3 frames or frames articulated by hinges. Everything was constructed as a type of Z.
The base frame had a mirror. Its function was to reflect the light coming from the exterior towards the middle frame on which the image was retouched. The center frame had frosted glass which allowed the entire thing to function as a table. Intermediate wooden interlocked into each other and allowed to block the cliche. These intermediaries also had the function of not letting light through the interstices. Last, the upper frame, opaque was intended to protect the user from stray lights.
Some versions had black sails falling on the sides, constantly to prevent parasitic lights (such as caps on high-end displays ).
The bottom frame additionally contained a drawer containing the editing resources which I will present to you now...
Pencils
I had been amazed to discover these famous pencils are simple pens, the same ones which are used in school.
The writer specifies that the tip of the pencil had to be both thin and long to protect against the pencil timber from obstructing the user's field of vision...
It was also important to acquire a yellow pen, which allowed me to hang on the glass plate (I do not know exactly what it is).
Some brushes could also be handy for touching up white dots or openings. These were made from marten hair, given, not too long, and forming the purpose well.
Colors
The colors were useful for retouching the unwanted (Indian ink, Prussian blue, carmine, and yellow). We discover here the four colors based on additive and which, combined together, make it feasible to acquire the other colors.
To prevent them from peeling off whenever they dried, they would have to be diluted in gummed water (preparation from distilled water and gum arabic) or in water containing glycerine.
The badger, the blobs
The badger was used to remove the dust and the blobs (leather) were used to soften the cliche.
It was advocated in the instance of retouching small dimensions and coated with small spots.
This chapter ends with great practice suggestions from the writer, especially on the light to be used rather daily, which is not surprising.
If despite all, the editing has been done at night, the alternative was to shed a gasoline lamp and insert a glass balloon filled with water involving the desk to retouch and the lamp. If the light was too white, it had been sufficient to put a few drops of dye from the water to decrease the dominant color (a correction of the white balance in the amount...).
Tag: